Showing posts with label Cooking. Show all posts

2017-05-29

Avocado Pesto – delicious and easy

I could literally live off of avocados!! I’m just so in love with them and there is nothing better than to dip some bread into an avocado. 

So today I’m sharing with you an easy peasy avocado pesto recipe for all those of you who love avocado just as much as I do.

What you need (serves 2):

  • 1 avocado
  • ¼ cup cream cheese
  • ¼ cup chopped almonds and /or bacon crumbles
  • 2 tbsp olive oil
  • 2 tsp vinegar
  • Salt & pepper
  • Handful of basil (optional)
  • 1 garlic glove (optional)
  • Pasta

1. Start by cooking your pasta and frying the almonds and/or bacon carefully (afterwards crumble the crispy bacon)

2. Add the avocado, cream cheese, basil, garlic, oil, vinegar, salt & pepper as well as about 10 tbsp of pasta water into a food processor and blend well. If you feel the pesto is too thick add more pasta water.

3. Mix the cooked pasta with the avocado pesto.

4. Sprinkle the chopped almonds and/or bacon crumbles

5. Bon Appetite!


This dish is really super easy but super yummy!

Enjoy your meal,

2016-12-12

Homemade Roasted Almonds – perfect little present

Are you in the need of a little Christmas present for your co-workers or friends? Then this recipe how to make homemade roasted almonds might just be what you have been looking for: they are sweet and crunchy and taste like Christmas – it’s like inhaling this special time of the year :) Plus it’s easy peasy to make them and takes hardly anytime

Piastuff.blogspot.cpom
What you need:
  • 1 cup sugar
  • 1.5 cups almonds
  • 0.5 cups water
  • 0.5 tsp vanilla extract
  • 0.5 tsp cinnamon


In a large coated pan (it’s important to use a coated pan as this makes cleaning a lot easier). Pour the water in the pan and add the sugar, vanilla extract and cinnamon. Mix it all well together. Once the mixture starts boiling add the almonds. Stir the almonds around once in a while. Wait until all the water has evaporated and the sugar starts to caramelize (be sure to catch the right moment so the caramel doesn’t burn or the sugar starts to crystallize again). Once all the almonds are covered evenly in caramel spread the almonds out on a baking paper and let them cool down over night. 


Piastuff.blogspot.com


Afterwards fill the almonds in little bags – and you are all set :)

2016-11-20

Fall = Pumpkin Time


As soon as the first leaves turn red, brown and yellow I’m craving for pumpkin dishes: pumpkin soup, pumpkin spice latte, pasta with pumpkin sauce, pumpkin pie, risotto with pumpkin pieces – the list goes on and on…

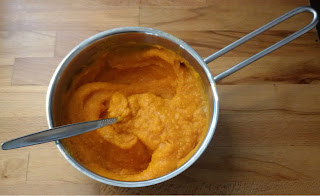
In order to speed up the process of making these lovely dishes pumpkin puree comes in really handy. As I’m not a huge fan of buying processed food I’ll share with you all today how to make your very own pumpkin puree – it’s super easy :)

Let’s get started: all you need is a pumpkin (I love using the red kuri squash as you can use its skin as well) and a food processor/blender.

There are two different ways to make the puree:

1. If you have a high quality food processor cut the red kuri squash (incl. its skin) into little pieces and steam them for about 20min (if you can easily poke them with a fork, they are soft enough). Afterwards use your high quality food processor to blend the soft squash into a puree – and you are done!

2. If you don’t have a high quality blender I recommend a different approach to make your homemade pumpkin puree: cut the red kuri squash into two halves and roast it in the oven at 350°F for about 40min until the skin gets wrinkly. Use a spoon to carefully scratch off the skin. Afterwards blend the pumpkin flesh using your food processor. If you don’t have a food processor or blender use a fork to mash up the pumpkin.


Piastuff.blogspot.com


Piastuff.blogspot.com


I usually distribute the puree in an ice cube tray and freeze it as I can easily defreeze the amount of pumpkin puree I need. But you can use any other way of preserving to make your pumpkin puree last longer.


Piastuff.blogspot.com

Over the next few weeks (until spring is here) I will share with you a few of my favorite pumpkin recipes – what is your favorite pumpkin recipe?

2016-05-31

Perfect Dish: Crepes – salty and sweet in one meal

As I love pancakes (e.g. for breakfast) it’s probably not a big surprise that I love crepes as well :) One thing I love about them in particular is that you can enjoy them salty and sweet in one meal. I usually start off with some savory ones and end with a sweet one for dessert.

One of my favorite combinations is green asparagus with a homemade Hollandaise Sauce – actually I enjoy Hollandaise Sauce with many different kinds of veggies. For dessert I prefer my crepes with some fruits and ice cream or cinnamon sugar.


So today I’m sharing my recipe for this lovely and easy menu (this serves about 3-4 people depending on the thickness of the crepes ;) ):

Crepes:
What you need:
  •         1 cup all-purpose flour
  •         1/4 tsp coarse salt
  •         4 eggs
  •         3 TBSP butter (melted)

Combine flour, salt, milk, eggs, and butter. Mix until batter is smooth and bubbly on top. Let batter sit for about 10 min at room temperature.
Heat a skillet over medium heat. Lightly coat it with some butter. Add about 1/3 cup batter and swirl the skillet so it completely covers the bottom of skillet. Cook until underside of crepe is golden brown (about 2 min).
Loosen edge of crepe with a rubber spatula and quickly flip it (this needs a bit practice but once you got it you’ll never forget ;) ). Cook 1 min from the other side. Slide crepe out of skillet on a plate and place it in pre-heated oven (about 120 F). Repeat with remaining batter.

Green Asparagus (about 15 stalks)

Trim away the bottom 1/4 of the stalk. The tip of the asparagus is very tender, but the farther down you go on the stalk, the tougher it gets.

Boil some water and add some slat and a hint of sugar to it. Cook the asparagus for 6-8 min (depending on the thickness of the stalk), slide a knife carefully in one of the stalks to see if they are done. Optional: Once they are done transfer the asparagus to cold water in order to maintain their green color.

Hollandaise Sauce
What you need:
  •        3 large egg yolks
  •        1 TBSP lemon juice (and optional 1 tsp of mustard)
  •        ½ cup melted butter


Put the bowl of egg yolks over a pan of gently simmering water. Slowly add the lemon juice and mustard. Whisk the mixture well.
Gradually add about 1/4 cup of the melted butter while stirring constantly. Slowly add remaining 1/4 cup butter. Continue stirring vigorously until butter is melted and sauce is thickened. The butter should melt slowly so eggs have time to thicken sauce without curdling. Serve immediately.
Trick: At this stage keep an ice cube close-by so if the mixture is starting to split, you can drop it in and whisk the mixture. This can save the hollandaise sauce in case of an emergency.

Dessert option
For dessert just add some delicious vanilla ice cream to the warm crepes and serve it with some seasonal fruit!


Bon Appetit 

2016-03-07

Comfort Food: Homemade Risotto with Prosciutto di Parma

In different periods of my life I had different comfort foods or favorite dishes. When I was a little girl I loved hash browns and still today I’m a huge fan of any kind of potato dish. That being said since quite a while now I’m really into Risotto especially top with Prosciutto di Parma – a special ham from the Parma region in Italy. I remember I used to be a bit intimidated when people told me about the cooking procedure of Risotto, but actually it’s not that difficult and as with most things in life the more often you do it the better you get at it :)

Piastuff.blogspot.com


What you need (feeds two people, takes about 30 min):
  •     1 Onion
  •     125gr Riostto Rice
  •     100ml White Wine
  •     400ml Vegetable Broth
  •     Parmesan Cheese
  •     Olive Oil
  •     Prosciutto di Parma


Start with chopping the onion into small pieces. Heat some olive oil in a pot and brown the onions without burning them. Add the Risotto Rice and let it brown for 2-3 minutes while stirring the rice-onion mixture. Once the rice starts looking transparent add the wine. Keep stirring until the wine dissolved completely.

Now the busy part starts: turn down the heat and add a bit of the veggie broth until the rice is almost covered. You don’t need to stir the Risotto like crazy but should stir it once and again until the veggie broth dissolved completely.

Go ahead and repeat this step until the complete 400ml of broth are gone. Be sure to set your stove to a medium temperature as otherwise the liquid will dissolve to fast without actually cooking the rice.

Once the Risotto is done – it should be moist but not too liquid or too dry (you’ll get the feeling for the right texture after a few times) – add as much Parmesan as you like (I usually add about 30gr directly and put more on the table so people can add as much as they want). 
The Parmesan will also soak up some of the moisture of the Risotto. On your plate add some freshly grounded black pepper and 2-3 slices of Prosciutto di Parma! I just love this dish and you?