Showing posts with label Baking. Show all posts

2016-03-16

Homemade Buttermilk Pancakes

The best way to start a Sunday morning (or any morning actually :) ) is with fluffy pancakes, crispy bacon and golden maple syrup. This is my favorite Buttermilk Pancake recipe! I love that it doesn't call for baking soda as I often feel like you can kinda taste it...

What you need:
  • 1 cup Flour
  • 1 cup Buttermilk
  • 1 Egg
  • 2 TBSP Melted Butter or Vegetable Oil
  • 2 tsp Baking Poweder
  • Pinch of Salt

In a large bowl mix the flour, baking powder and salt. In another bowl whisk the egg, buttermilk and oil together. Pour the liquid mixture into the flour-baking-powder-salt bowl and stir by hand. I used a mixer once but it actually over mixed the batter hence I mix it by hand. The batter should be slightly lumpy. 
Let the batter rest for about 5-10min so it’ll get really fluffy thanks to the baking powder. Heat the skillet and grease it before pouring about ¼ cup of batter per pancake. Let the pancake sit for 1-2 minutes until bubbles form and then flip it carefully over.

Server with crispy bacon and golden maple syrup – best breakfast ever!


Bon Appétit,

2016-02-02

Homemade Fortune Cookies

For New Year’s a friend of mine and I decided to make homemade fortune cookies with funny little sayings inside. We followed this recipe by Martha Stewart. However, we decided to make the cookies a bit smaller and instead of placing them in cups while they dry we used shot glasses :)

Piastuff.blogspot.comPiastuff.blogspot.com

Before we started the whole baking process we sat down and wrote down different sayings and “fortunes”. We used normal paper and pens as we didn’t consider that the dough is quite greasy and unfortunately all of our notes had oil stains on them. So next time we will definitely use some other kind of paper – it’s always a learning curve ;)


Piastuff.blogspot.com


But it was so much fun! Everybody enjoyed our notes and the cookies.

What kind of fortune would you write down?

2016-01-26

Last minute pastry: Palmier, Elephant Ear or Pig Ear

The other day I was invited to a potluck and was told to bring something sweet. I didn’t have a lot of time to prepare something and had to come up with an idea quite fast. So I decided to make Palmiers also known as Elephant Ears or Pig Ears – with obviously Elephant Ear being my favorite name for this delicious pastry :)

It took me less than 30 min to prepare them and everybody always loves them!

What you need:

  • 2 rolls of ready-made puff pastry
  • 150-200g sugar
  • some water
  • pastry brush

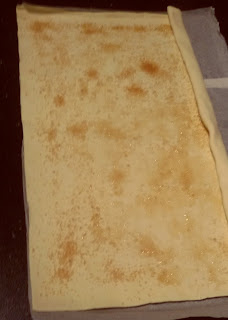
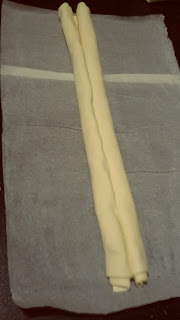
Start with unpacking the puff pastry. Carefully spread some water on the puff pastry using the pastry brush. Afterwards distribute the sugar evenly – the sugar and the water will caramelize while backing *nomnom*. Afterwards start rolling the dough from the edge to the center. Once you reached the center start rolling the other side of the dough from the edge to the center as well. 


Piastuff.blogspot.comPiastuff.blogspot.com


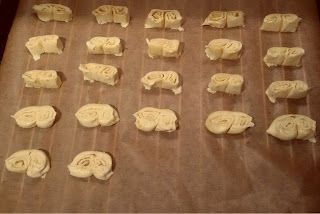
Cut the dough into thin slices about 1 cm and spread them on a baking sheet. Flatten the Elephant Ears carefully using a knife or spoon.
Piastuff.blogspot.com

All there is left to do is to follow the baking instructions of your ready-made puff pastry. And that’s it!! Enjoy them either warm or cold – I personally love them if they are still warm ;) 


Piastuff.blogspot.com

If you want to you can turn them into ‘fancy’ Elephant Ears by dipping on side of the pastry into melted dark 
chocolate.

Have fun baking!

2015-12-02

Best Apple Pie Ever: Bacon Apple Pie

I don’t know if I mentioned it before but I am a huge bacon-manic! I just love bacon and I think it fits with almost every dish. Having bacon pancakes with syrup in the morning is just about the perfect way to start the day :)

Bacon and apples are a perfect mix – sweet and salty at the same time. So I decided to make a bacon apple pie! As I’m not so familiar with making a pie crust from scratch yet I decided to go with a regular short crust instead.

You need:

  • 2.5 cups flour + some extra flour 
  • 1 cup butter (coldish) 
  • 0.5 cups sugar 
  • 4 apples 
  • 10 slices of bacon 
  • cinnamon 
  • maple syrup 

For the dough mix butter, flour and sugar. The dough shouldn't be too sticky or too dry. If it is too sticky add a bit more flour. Afterwards let it rest in the fridge for about 30 min. You can of course also use a ready-made pie crust instead.

While the dough was resting I fried 2 slices of bacon until they were super crunchy and crumbled easily. Afterwards I peeled the apples and cut them into small pieces. I added them into the same pan with the bacon crumbs. Then I softed the apples for about 15 min on medium heat (if possible use a lid on top of the pan). I added some cinnamon for the flavor and some flour to soak up the extra liquid.

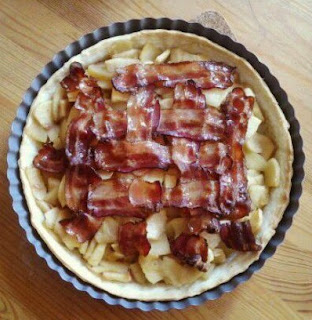
While the pan with the apple-bacon mix was sitting on the stove I prepared the bacon topping. On a sheet of baking paper I arranged the bacon in a grid-like pattern. Before putting the bacon into the oven I sprinkled a bit of maple syrup over it. Depending on your oven, the bacon needs about 10 min at 300°F. It shouldn’t be super crispy yet as it will be baked again with the apple pie.

In the meantime I rolled out the short crust and spread it in a baking pan. The short crust needs to be blind baked for about 15 min at 340°F. Afterwards add the apples and carefully place the bacon-grid on top. Bake for another 25 min (if you are using a ready-made crust follow the instruction on the package). 


Piastuff.blogspot.com


Bon Appetite – I hope you enjoy the bacon apple pie as much as I did!

2015-11-18

Cookies Cookies Cookies

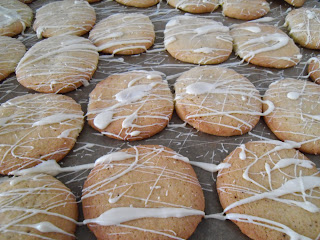
When I saw this recipe for 'Brown Butter Icebox Cookies' on A Beautiful Mess I knew immediately I had to try it out. Emma from A Beautiful Mess totally meets my taste when it comes to cooking and baking. Already my first try on these cookies turned out amazing and super yummy.

I had never heard or worked with brown butter before but I love the extra flavor it adds. I also followed Emma's advice and added some sea salt to the white chocolate topping which I recommend trying out especially if you love the combination of sweet and salty like I do.


Piastuff.blogspot.com


So preheat your oven and hop over to A Beautiful Mess to get the full recipe!