Showing posts with label Living. Show all posts

2018-06-25

Magnetic Wooden Photo Frame DIY

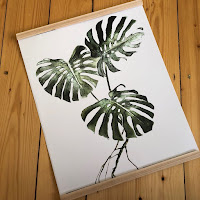
If you paid attention to interior trends lately you probably noticed magnetic wooden photo frames. I really love how the simplicity of the frame makes the poster / painting / photo pop out. However, I didn’t like the price the frames come with. So I decided to dig a bit deeper and came up with a cheap and easy homemade version of the magnetic wooden photo frame.


What you need to make one frame:

- Wooden strips e.g. beech (mine are 2 cm / ¾ in wide)
- Magnetic tape
- Nylon thread (or any other thread you want to you for hanging the frame e.g. leather cord, jute yarn)


Start by measuring your poster / painting / photo and buy (or cut) four wooden strips with the appropriate length. Next cut and attach your magnetic tape. The tape I bought was quite strong so I ended up cutting in total four pieces of tape each 5 cm / 2 in long and cut each in half lengthwise. When attaching the tape to the wooden strips makes sure they’re all installed at the same position otherwise the magnetic effect won’t work. 


piastuff.compiastuff.com


Once you are done attach your thread of choice to one or two of the wooden strips. As I wanted to use a thin nylon thread I attached it to both upper wooden strips to give it more stability.

Now all you need to do is to add your poster / painting / photo and mount the magnetic wooden frame to the wall.


piastuff.compiastuff.com

I really love this cute frames and it’s such a simple and easy DIY plus you could also stain the wood to match the rest of your interior design.

What do you think?

2017-12-01

DIY Xmas Wreath


One thing I love about Christmas is definitely the color scheme: red, green, white and cold! This year I decided for the first time to make my own Xmas wreath. It was super easy and looked great – I even preserved it for next year but haven’t decided if I’ll use the old one or will make a new one (the nice smell of the twigs is obviously just something you get with a fresh wreath).

What you need:


- metal ring (gold)
- wire (gold)
- twigs (I used eucalyptus)
- little decorative figures (I used two turtledoves, obviously ;) )

Start off by cutting the twigs apart so you end up with single and shorter twigs. Use the wire to attach the twigs to the metal ring bending the twigs carefully. I used about two pieces of wire (each about 10 cm / 4 in long) per twig. !


Make sure to leave out a small 5 cm / 2 in part which you will use later to hang the wreath. Once your metal ring is nice and evenly covered add your decorative figures. Finally, attach a piece of the string to the 5 cm / 2 in gap and hang it on your door. I actually prefer to hang it inside the apartment on a door or wall as otherwise you won’t see or smell your lovely wreath. And that’s it


I’m already in the mood for Christmas – what about you?

2017-10-12

Macrame Curtain

This summer I struggled with a fly-problem: the plants and flowers on the balcony seemed to attract flies which then decided to take a peek into the bedroom.
As the window construction is quite old no screen door seemed to fit the measurements and screen curtains are usually quite ugly and take away a lot of light (I’m talking about those weird plastic strip curtains preferably sold in orange tones…).
An idea popped up in the back of my mind: “what about a macrame curtain? Didn’t you wanted to try out some macramé anyway? Maybe this is the perfect time and situation”. And that’s exactly what I ended up doing and I loved to macrame – it was so much fun and required quite a bit creativity as you need to handle a lot of string, think about the perfect pattern and find the right spot to do it.

You need:
  •     Wooden stick a bit longer than you want your curtain to be wide
  •       Macrame yarn e.g. this one
  •       Spikes or hookes to hang up the curtain / hold up the wooden stick

1. Start with thinking about the measurements you need: I wanted to make a curtain which was about 60cm wide and 200cm long with a pattern only in the upper quarter of the curtain. Depending on the project you are planning and whether you’re making the knots tighter or looser you need to calculate the needed length. 
I wanted to end up with a length of 200cm and thus already knew that each piece of string needed to be at least 400cm (as you fold each string in two) and added an additional 100cm so I ended up with a total length of 500cm. 
I had a rough idea what I wanted to the curtain to look like and ended up cutting 12 strings each 500cm (I started off with 10 but felt it was too loose and then added two more strings).


2. There is a pretty simple trick which I applied when cutting string: I measured one piece of string, applied masking tape and cut in the middle of the tape – this way you have tape left on each side. I additionally applied some masking tape to the other end of the string which in this case I didn’t need to cut as I was using a new ball of yarn. This piece of string was my ‘original piece’ and I measured and cut all other pieces against it using a different type of masking tape. I left the tape on the string until the very end when the whole project is done as the tape prevents the string from unraveling.


Piastuff.blogspot.comPiastuff.blogspot.com


3. Start wrapping your strings around your wooden stick using the Lark’s Head Knot.


Piastuff.blogspot.com


4. About 5cm below add a regular knot tying two neighboring strings together. Continue with regular knots until all strings are tied. Make sure you tie all knot either clockwise or counterclockwise but be consistent in your choice.

5. About 5cm below the regular knot continue with two Square Knots on top of each other – tying one clockwise and the other one counterclockwise.


Piastuff.blogspot.com


6. Repeat step 4 until you have 3-4 rows of Square Knots. Every second row the outer strings will just hang loose and will be incorporated into the pattern again with the next row of knots.

7. Finish off your pattern by repeating step 3. Your pattern should take up no more than the first quarter of the curtain as you still want to be able to walk through it.

8. Hang up your curtain using spikes or hooks. Once the curtain is in place give it a nice trim and you’re done!!


Piastuff.blogspot.com


I absolutely loved this project and macrame is a lot easier than I thought! I looked up a few of the knots on Google or YouTube but if you used to make charms for your friends in school a lot of these knots will be familiar to you. 
And the curtain totally serves its purpose and keeps the big flies out :) If you continue the pattern all the way until the end you can also make a beautiful wall hanging or room divider – just make sure to use enough string.


Happy tying,

2016-08-24

How to hang up pictures - simple but perfect

You know the feeling of having too many white walls? That’s exactly how I felt with the huuuuge white space above the couch. The more time passed the more it bothered me. So I started looking for nice pictures and posters. I didn’t really know what I was aiming for at the beginning, usually I just know what I don’t want which is a starting point as well :)

So I started looking at a lot of pictures online e.g. at Pinterest or other websites to get some inspiration. In the end I decided on three lovely prints I found on Juniqe I absolutely love the style of their art designs and that they offer each poster in various sizes.

I decided to get one large print and two small ones which were half the size of the large one. In my mind I already decided how to hang them up. I knew I wanted to get frames including white passe-partout as I felt they would highlight the prints really well. The big surprise came when I went frame shopping at Ikea and my wall design was destroyed as I hadn’t taken into account the size of the frame and the space between the frames. Suddenly I didn’t know anymore how to arrange the posters best.

Usually each frame has an inlay white or gray paper which has the same size as the frame. In order to find out how to hang up the frames the best I used washi tape and the inlay of the frame to simulate the arrangement. I ended up with three different approaches and finally settled for one. Using this method really help me to see how things would actually look rather than just trying to picture it in my mind. You can step back, look at it from different angles and look at it for several days before deciding. 

Piastuff.blogspot.com

The actual process of hanging the frames up was super easy as well – I just hammered the nails directly through the inlay and ripped it off afterwards. Thus I made sure I got exactly the wall design I wanted.

Piastuff.blogspot.com


I love the outcome – what about you?

2016-06-24

Preparing the balcony for hot summer days & nights

As soon as the first hot summer days arrived I knew I wanted to get the balcony ready: sitting outside in the morning with a coffee, in the afternoon with a good book or at night with a cocktail – I just love all those things.

So first of all I decided to cover up the tile floor of the balcony with some lovely wooden tiles. It was super easy and already made a huge difference – it looked and felt (mainly for the feet) so much more comfortable!

Piastuff.blogspot.com

Next thing I bought some plants. I mixed evergreens with flowers. I especially love the hydrangea, always wanted to have some :)

Piastuff.blogspot.com

The balcony is kinds small, so either one person can lie comfortable in a deckchair or two people can sit with a tiny table –both scenarios work for me. I added some fairy lights to use the balcony even after the sun sets.
Piastuff.blogspot.com

As the balcony is quite narrow getting a good shot isn’t easy (I might update these later..). 

Hope you love it as much as I do,

2016-02-09

Re-Doing the Dining Nook Budget Friendly

My latest project is re-doing the dining nook. I had so many ideas in mind about how to decorate it but some things were set in stone from the beginning: I inherited some cute furniture from my grandma and I wanted to include it for sure. It’s a small antique bench. I just always loved the idea of having some kind of comfy piece of furniture at the dining table – some friends of mine actually use a mix of chairs and a couch :) Another thing I was sure of was that I wanted to paint the walls of the dining area dark blue – I’ve dreamt about this for quite a while. So I painted the walls, set up my grandma’s bench and got a nice wooden table and wooden chairs. But somehow it didn’t feel right… 

Piastuff.blogspot.com


I knew the wood would darken over time and I do love the light color of pine but it just didn’t feel right. I thought about getting a nice rug maybe but re-doing the dining nook was a low-budget-project and most larger rugs are quite expensive. Then it just hit me: why not just paint the table and chairs with a dark glaze? 
It bought an eco-friendly wood stain and tried it out on the bottom of one of the chairs. And I loved it. I painted both chairs and the table in less than two hours! 


Piastuff.blogspot.comPiastuff.blogspot.com

The darker table and chairs match so much better with my grandma’s bench and look really nice in front of the dark blue wall. I couldn’t be happier and the whole project was totally budget friendly! I’ll just give you a sneak peek of the dining nook at the moment as I’m not totally done yet, so there is more to come – can’t wait to share it :)